Thursday, December 15, 2016

Pirates!

Much has been written about pirates at sea. This week it was our turn: Dreamtime was attacked, boarded and invaded by two ferocious pirates: Josh and Cooper. Grandchildren to the owners of the nursery where I am fortunate to have working space, they boarded, and politely asked if they could come and see what I am doing. They gave some real help: Cooper crawled right into one of the cabinets I made to hold the spanner to a recalcitrant nut.

And we had a stow-away too: Cooper decided he likes the cabinets under the front bunk as a hidey-hole.

What a pleasure to have such nice, well brought-up pirates on board!


Stow-away1

Sunday, December 11, 2016

Sails

I am bored with woodwork. I learnt a lot, also about fibreglassing, but it is just taking too much time. So I ordered the rest of the sailcloth and reworked the sailplan.

What material? Well, it is something that the cute Tanya with the nice accent tells me will last for ever in bright sunlight. So there. It is a ripstop thingy called ALIAS MPC 1.8.

The sailplan is a chinese rig, with abut 32 square meters. I had it in my head for a long time, but only recently put it down on paper. There may be a jib in front in due course, we will see. I decided to use 25mm fibleglass pipes for battens. A little pricey, and probably way overkill.

David helped me lay out and cut the panels, with Shahnaz' invaluable assistance. Pythagoras helped determine a square foot. Thanks, old boy!

Now the panels have to be trimmed, the proper seams installed, and then the big one: The sails have to have some shape. I decided to try Roger Taylor,'s triple H sail, see his YOuTube video.https://www.youtube.com/watch?v=E-IbUt-CTRQ 

As usual the possible sailmakers backed out, so yours truly will do the honours. Watch this space...


laying out the battens. Pythagoras helped ensure that the
 foot of the sail is square. 

David and I laying out the sails. It was blistering hot. 

Saturday, November 19, 2016

Tools

My Grandfather's setsquare and edge gauge
Allow me a little rant on tools. I bought some extra tools for steel work, but thought all my work would be done by professionals. Little did I know.  For the steel work I bought a small inverter welder to augment my old Italian buzz box welder, and both give me good service. I have a small compressor that does everything I need it to, when I do. Mostly I use it for spray painting, but some light use of air tools are called for sometimes: A needle scaler, a small die grinder, everal pneumaic drills, a sander/polisher.

My woodwork tools are mostly manual, and I enjoy using some tools I have from my grandfather.


Circular saw being used as table saw

Saw broken

Saw fixed...
B&D belt sander, nice and small, light, but belts are not easy to find

Dead mouse, live mouse


Dear angle grinders. 
Professional angle grinder


But most of my tools are electrical, and there is my gripe. For the boat I bought a small 1KW generator, a Kippur, which has given great service, because I do not have electricity where I work at the moment. In due course this generator should be installed in a cockpit locker.

I have an old circular saw, a 500 Watt Black and Decker. It has given great service over many years. The other day I dropped it, and its handle shattered. And I can get no replacement saw under 1200 Watt. Which would not work on the generator. And those are too heavy and clumsy. Bosch does make a smaller, 800W model, but it is not imported into South Africa. In the end Superglue did the job, and the old saw is working again. Manufacturers, can you please take note: Bigger is not always better!

Sanders are essential. I use a Black and Decker orbital sander, it is good and reasonably handy, but the emery cloth is held in place by two feeble springs. I wish for a better method. I also have an old B&D belt sander that had been consigned to a crate because I could not find belts. But with online shopping I can now get belts that fit with some struggle, and last longer than the original ones did. If it goes I will have the same problem: All the new machines are much biger and stronger, heavier and over my power limit.

I also have a new Black and Decker mouse. A small sander, it is handy and very strong. I used it to clean the rusty steel, clean up the undercoat, cut the filling epoxy, and many other jobs, far beyond that one should ask it to do. It got wet and blew an internal fuse on the curcuit board, which I shorted with some copper wire. But at last, one sad day, it went "phut" and died. I now have a new one.

Working with steel is impossible without an angle grinder. I used to have an AEG industrial one, and after years of (ab)use the gear system stripped. Now the parts do exist, but I cannot get them from the agent. I found them on an Australian website, but the dealer there refers me to the South African dealer, who does not answer my enquiries. I then bought a Bosh Professional grinder, a beautiful machine. And then Ryobi offered a promotional pack with a small angle grinder in it. This has done good work, it is useful to have two machines: one with a cutoff blade and one with a grinding blade. But just the other day it went "phut" and died. Sad. Maybe the gear unit can be transplanted to the AEG?

I used to have a DeWalt electric drill, which I bought after previous hobby drills either exploded or broke. The DeWalt gave good service but the gears stripped, and could not be replaced in South Africa. The repairman recommended a Sparky, said to be a German industrial machine. My son turned up his nose: An industrial machine, and all in plastic? But twenty years later it is still going strong.

Sparky drill. A champion. 
With the Ryobi promotional pack came a small (350 Watt) drill. I used it often because it is light, but the real use is as a motor for my small Unimat lathe. It used to have a 75 Watt two speed motor that blew up, and now I have variable speed and too much power for the little lathe. In the next blog I will show how I use it for wood work.

Small Ryobi drill doubling as lathe motor. 
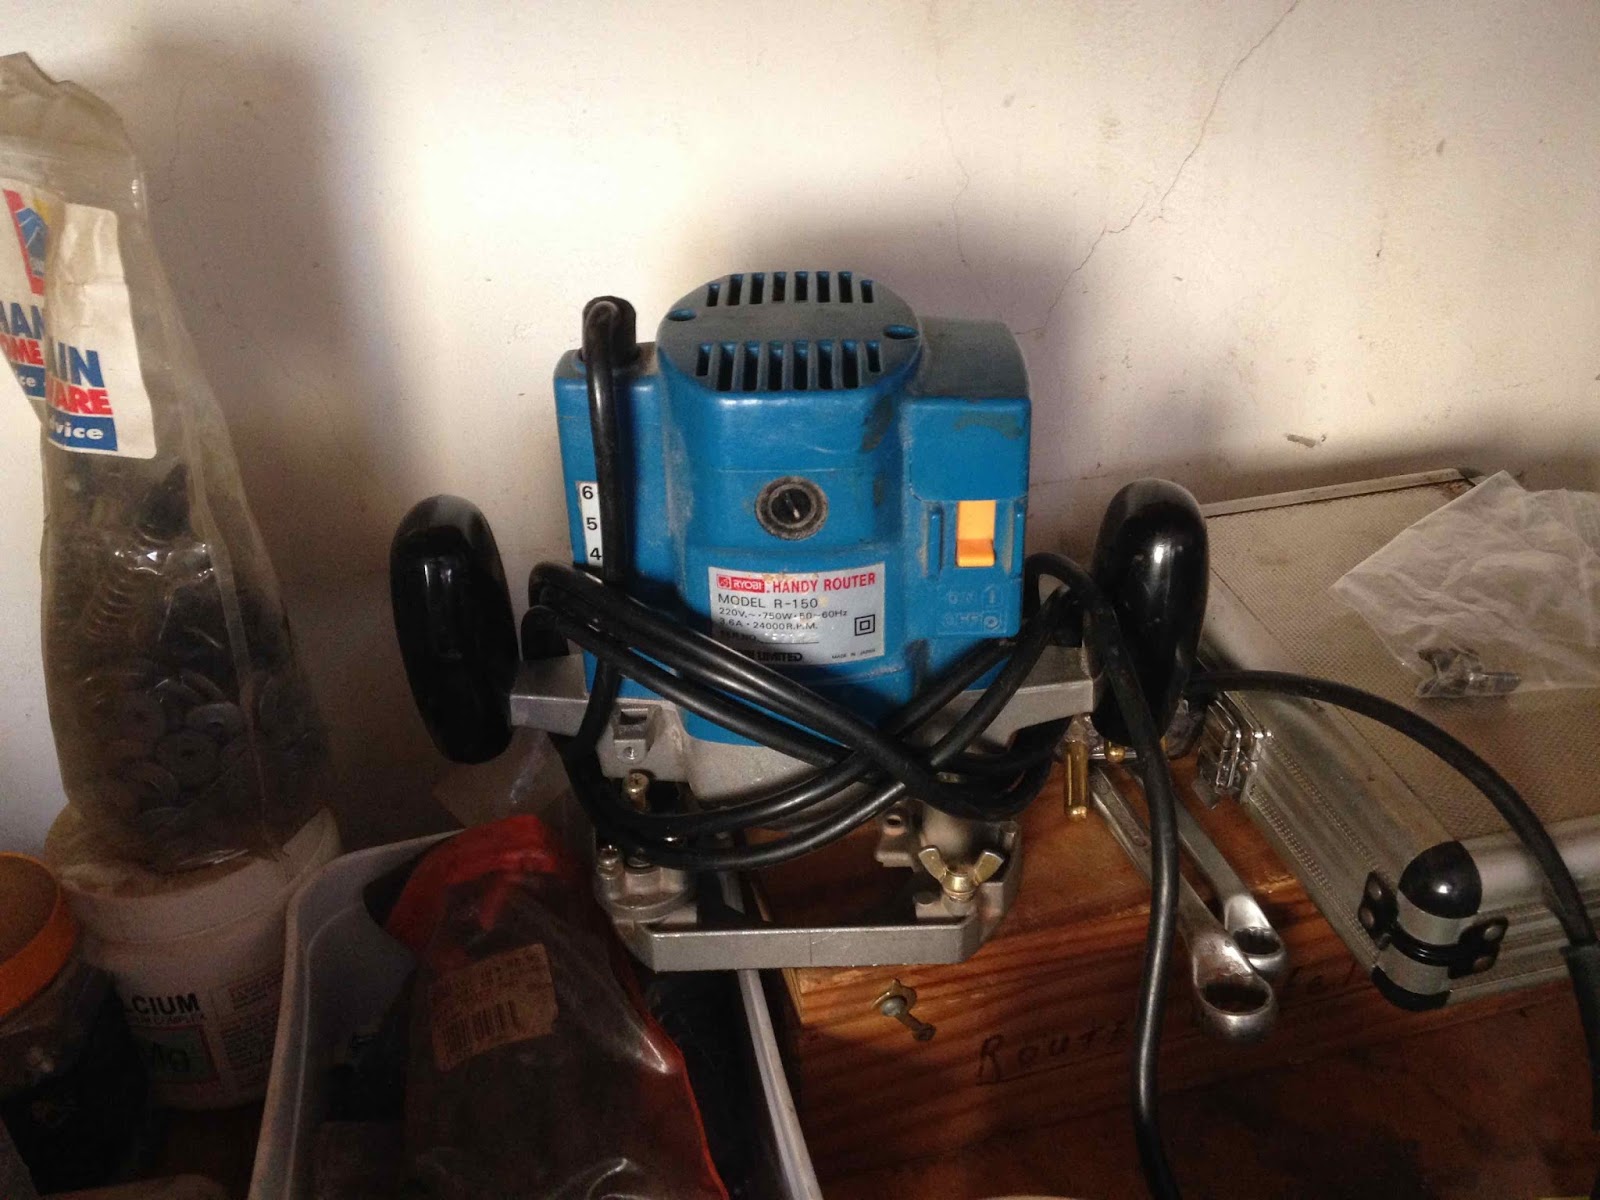
Woodwork is not my thing, but my ex-father-in-law enjoyed it, and left us a number of tools, including a Ryobi router. The boat work forced me to learn to use it, and it is an interesting tool, though much of its uses are beyond me. The problem is: it has an 8mm collet. Most of the tools we can get here have ¼ inch, or 6mm shanks. So there is a reducer, which is a problem. And the collet is broken, so it falls apart when you take it out. Well, the series is discontinued, the collets are not available, and I could make one on the small lathe, but a die for 1.25mm threas will cost half of what a new router will cost. We can put a man on the moon but we cannot standardise on collets? Really?

On cordless tools: I have a Bosch cordless drill/screwdriver, passed on by Alexander. The battery pack has gone south, amd a new battery pack will cost what a replacement cordless drill would be. Since it is a 12 volt machine the drill goes into the boat; with a little rewiring it will run off the battery system.

Ryobi router, but the collet cannot be replaced!
I am also looking into a cordless vacuum, as my present hand-me-down vacuum uses 1800 Watt, so the alternative is hand cleaning...

Slave labour: Cleaning by hand

Tuesday, November 15, 2016

Bunk beginning to look like something

Front bunk design in place
And the woodwork continues. The design and building of the bunk in the front cabin is taking shape. Keep in mind that it has to be removable, and has to go in through the main hatch, and you will relise that the think has to be made in sections. I had a lot of help from Shahnaz, and also from the dogs, who were not at all reassured that I know what I am doing. Of course I do not, this is an organic design process. I am reminded often of Doug Jackson's saying: I learnt so much from my mistakes that I am planning to make some more.
Are you sure the thing is set for 35mm?

What are you doing there?
My grandson, Diederick, came to help, and thought I am maing a mess inside, so he started cleaning. Much appreciated! The first time he came for a visit he was not quite as helpful.

And we are looking at bow art. My artistic abilities did not impress many people, so Sharon made up a few dessigns. I am inclined to this one. Coments are welcome.

Semi-final concept. 


Oupa, this place is a mess!
On his first visit he slept on the job. 
Sharon's bow art. Comments?

Sunday, October 9, 2016

More sanding, screwing, and a new hatch

Blood, sweat and tears. Stainless steel is sharp. 
Setting up a slide milling machine
Slides are stuck in with Sika
Some welcome assistance from Shakil, from Mauritius, made the work proceed a lot faster. He brought some engineering precision to my usual hit-and-miss approach, and we set the small circular saw to cut accurate slots in the plastic slides for the new hatch. Yes, the sun was beginning to eat the old wooden hatch despite the best varnish I could throw on it. And a steel boat must have a steel hatch, I think. So stainless steel was bought, bent and shaped, slides made and assembled. But they stuck despite our accurate measurements and cuts. So, since Shakil had left, I got the angle grinder out and widened the slots. Sorry, Shakil, sometimes the hit-and-miss process hits the spot! Now a nice wooden edging must be cut to avoid getting scalped on the sharp edge. How does one cut curves accurately?

And the hatch is in. Almost...
Inside work proceeded apace. Fore-under ceilings and insulation is in, again largely due to Shakil's help, and I changed the system for holding the floors, they now have countersunk stainless steel bolts holding in stainless steel RivNuts in the angle iron floors, and blocks on the sides of the angle floors keep the planks aligned. One still needs to be trimmed, and the forward cabin needs more floor planks.

Shakil helped with the ceilings under the foredeck. 
The side cladding in the saloon has begun, but the problem now surfaces: My screwing blocks are 32mm brandering, the frames are 40mm steel. The result is that either the plywood cladding planks want to fit between the frames, leaving steel exposed, or the blocks need padding up. I am going to try the latter. Before sandblasting and painting we put steel strips under the cockpit and where the pilot berth should go for panels to lie on, but because I was worried about rust under the strips I did not weld those on right through the hull. I should have, that would have made cladding a walk in the park. To weld now would be a major exercise, but maybe I should bite the bullet. In the meantime I am going to put plywood strips on the blocks to hold the cladding, with bolts through the strips into the blocks, and inserts in there. Comments are welcome. 
She has to have eyes. 

I am also looking at bow art. Dreamtime has to have eyes, to see rocks and things, but I also fancy the idea of a dolphin, having been told that a buxom mermaid would land me in hot water. Sharon has begin to draw a combined dragon and dolphin, and other design ideas would be most welcome.


Or would a dolphin do?
I also finished the re-do  of the bulkhead panels. They were in 9mm ply, but could not conform to the curvature of the steel. I literally broke them out, replaced them with 6mm ply, and used the old holes for the opening ports to make frames. Looks reasonable, I think. I also made a number of wedges, again from the lovely birch ply, well sealed, to fit in where the hull and the bulkheads or floor planking do not quite match up.

Making plywood wedges is easy. 


Panelling in the forward cabin is getting there. 


Saturday, August 20, 2016

Sanding, sanding, sanding... and then sticking, sticking.

Frames for the main hatch.
Rigging up to hoist the cabinets. 
For the past weeks I have been sanding down lacquered panels to give the glue somewhere to stick, and sanding down new panels. Now some are going in, and more will be fitted in the coming week.

I made frames for the main hatch, with cross-bars for handholds. These were made, ruined, re-made, routed, sanded, and finally glued in place with Sika. They seem firmly in place and I trust they are not going to go anywhere.

The offending panel in the main cabin was stripped, and a new one made, Surprisingly it came out well, the holes just needed a little re-drilling.

Security detail: where are these from?
The Health and Safety geese at the building site
were not impressed. 
I also began to prepare for fixing the cabinets in the forward cabin, first hoisting them on board, then measuring them, tracing where they should go, and installing brass inserts for the bolts. These are left-overs from my late father-in-law's defunct furniture factory. After 50 years in storage they had to be turned down, and hopefully will go to sea as he dreamed of doing.

Delicate dismantling of a badly made panel:
machete and number one persuading tool
Gluing the screwing blocks. Dozens of them
Bolting in the brass inserts
The finishing washers I had to have smuggled in from the UK were installed in a few places. They are just not available here, and are cheap enough, but the supplier would not deliver in South Africa. Now all the visible bolt heads have to be finished like these, and I will finish the wiring and installing the lights at the same time.

Finishing washers make the countersunk bolts lookbetter
I also continued gluing screwing blocks along the inside of the hull, to hold the covering planks, and hide the insulation. As in the past, high technology does not scare us: CAD is the order of the day. You can see the cardboard panels that will become plywood covering poanels - Cardboard Aided Design.

And after months of working, buying bits and pieces, using some, working, buying more, there was a need for sorting out the bolts into different lengths, nuts into regular and Nylock, and so on.

Hopefully I will have some more hands helping me in the coming weeks. But the dogs and geese at the building site are always there with a demand for attention, and sometimes a hissing comment.


Sorting the bolts, nuts, washers. 


Making cardboard mock-ups of the panels that
will cover the hull. Screwing blocks in evidence


Sunday, July 10, 2016

Still working at the woodwork

Insulation batting: a few more blocks are needed.
Another month has come and gone, and the progress is rather slow. I have had to spend quite some time doing other things, and also re-doing things I screwed up. Amazing what a difference 10mm makes. And once cut, you cannnot put it back.

The insulation work has gone reasonably well, and showed up a few things that need re-doing. I have also received the light fittings, so a number of the boards have to come out again. But that will happen in August.

My co-workers have also been absent, but Alexander helped me with the router, and I am slowly getting better with it.

Oupa Piet's router; a dark art. 
CAD: It is going to fit!
Yes sir! It goes in and looks right!
CAD (Computer Aided Design) is the latest craze, and I used a variation to see how I will get the cabinetry into the boat: Cardboard Aided Design. These two cabinets will go into the front cabin, and need to be removable. Note, I used the 4 inch spikes as locating pins for the shelves inside. To handle the assembly single-handed I made long clamps from 50 x 50 brandering with threaded rod. It worked a treat. Now the cabinets have to be finished off, dis-assembled and glued, then sanded, varnished, fitted, fettled... a long way to go.

Threaded rod clamps hold all together, most of the time. 
Roofing spikes serve as locating pins. 
The next job is the rest of the front cabin: bunk, side cladding, panels against and under deckhead. Then comes the main cabin: One bulkhead has to be redone, the seats have to come out and be redesigned, and the hull insulated. The galley has to be fitted and re-evaluated, and then comes the bathroom. Not to mention the electrical system that has to come in soon. And then the plumbing.
The two assemblies look right, but there is still a lot of work!
Note the split in the bigger cabinet, it is too big for the hatch
 as it is. 

I also made a plywood mockup of an anchor I intend having cut, but the first try showed that my bow roller is not right. And I made a mockup of the companionway ladder, but the final attempt will have to wait until I am better with the router, and the floor panels are in.

Anchor mockup
And lastly I discovered that the sun is making fun of the very best varnish I could find. Six months down the line and it is flaking off the companionway hatch. So what now? Cladding with stainless steel? Making one out of stainless steel?

Screwing blocks being sealed. 
I have also begin preparing another lot of blocks to hold the panelling along the lower part of the hull, this must also be insulated, but there is still a lot of cabinetry to finish.


Companionway ladder will go here, but where exactly?


Main hatch: varnish coming off already.